TUTORIAL OAuth2 Django 2 and Djoser - part 1
25 Jul, 2020OAuth2 Django 2 and Djoser - Tutorial pt 1 - Introduction
There is repo on GitHub in case you want to clone the code.
''The truth is rarely pure and never simple.''
    - Oscar Wilde
There is so much confusion when it comes to OAuth and Django! I wasted quite a lot of time on getting lost inbetween another forks of another package, app or a library. Sadly, maintanance issues or REST non-REST packages adds to the confusion.
After making a research I decided to choose Djoser library that works quite well. Is maintained, has nice docs and could be used for OAuth2 integrations. Many libraries use social_django (social-auth-app-django) under the hood. This tutorial was made due to BETA social implementation that does not have extended documentation (yet!).
The goal : Use 1 library to get REST extension for Django Authentication with extended User model that work with Google OAuth2.
Basically to kill two birds with one stone ( this harsh translation of polish ‘cook two meals over one campfire’ always strikes me )
Let´s get to the chase! What we will do here:
Part 1
- Start the project, install libraries and apps.
- Explain all neccessary settings
- Explain urls
- Create Google OAuth credentials ( Facebook in Part 2 ).
- Use POSTMAN to test the basic flow. ( by the way here are, POSTMAN tricks and POSTMAN for Jedi posts in case you’re interested )
In contruction… 🚧🏗️
- Explain the basic flow - architecture chart - how does it work?
- Implement the basic flow in VueJS
- Implement the Facebook OAuth2
1. Start the project, install libraries and apps.
Start your virtual environment using virtualenv, activate it and install django:
virtualenv venvSocialDjoserDRFJWT
cd venvSocialDjoserDRFJWT
source bin/activate (on Unix)
Scripts\activate.bat (on Windows)
pip install django==2.2
Create project and one app for extending User model:
django-admin startproject SocialDjoser
cd SocialDjoser
python3 manage.py startapp accounts
Now let’s install all python-backend libraries we will use throught this tutorial ( later we also use npm-vue-js libraries ):
pip install django-cors-headers
pip install djangorestframework
pip install djangorestframework_simplejwt
pip install djoser (version 2.0.3 as of writing this tutorial)
pip install social-auth-app-django
pip install Pillow (for adding user's thumbnail - not related to social oauth)
pip install psycopg2 (JWT time )
¡Important! :
- Djoser version 2.0.3 uses social_django (social-auth-app-django).
- social_django uses social_core (social-auth-core) under the hood.
- We use restframeworksimplejwt (djangorestframework_simplejwt) for customizing information that comes in the JSON Web Token.
2. Explain all neccessary settings
Let’s have a look at the placings is settings:
INSTALLED_APPS = [
    'corsheaders',              # I always put it first here and in Middleware!
    'django.contrib.sites',     # We add this as extra
    'django.contrib.admin',
    'django.contrib.auth',
    'django.contrib.contenttypes',
    'django.contrib.sessions',
    'django.contrib.messages',
    'django.contrib.staticfiles',
    # Project apps:
    'accounts',                 # The app we have created for extending User model. Needs to go before the DRF since it has User model that DRF uses.

    'rest_framework',
    'djoser',
    'social_django',          # Not needed to add but pip install required. Adding it here will create additional acces to social user via admin
    'rest_framework_simplejwt',
    'rest_framework_simplejwt.token_blacklist'  # Add it to avoid problems with migrations

]
Now let’s add CORS middleware and exceptions for developing purposes. Remember you shouldn´t whitelist everything in production!
MIDDLEWARE = [
    # IMPORTANT: CORS policies has to go before other entries
    'corsheaders.middleware.CorsMiddleware',

    # IMPORTANT: Essential when using django_social
    'social_django.middleware.SocialAuthExceptionMiddleware',
]
The extra corsheaders middleware is for allowing in-browser requests.
Ok!
Now Django REST Framework, JSON Web Token and Djoser settings.
REST_FRAMEWORK = {
    'DEFAULT_AUTHENTICATION_CLASSES': (
        'rest_framework.authentication.SessionAuthentication',
        'rest_framework_simplejwt.authentication.JWTAuthentication',  # OAuth2, JWT
    ),
    'DEFAULT_PERMISSION_CLASSES': (
        'rest_framework.permissions.AllowAny', # Up to you to decide, depends on your project
    )
}
import datetime
from datetime import timedelta
from core import settings
SIMPLE_JWT = {
...
'AUTH_HEADER_TYPES': ('Bearer', 'JWT',), # Adding Bearer for POSTMAN testing
'USER_ID_FIELD': 'id',
'USER_ID_CLAIM': 'user_id',
'AUTH_TOKEN_CLASSES': (
'rest_framework_simplejwt.tokens.AccessToken',
# 'location.to.custom.token.CustomJWTToken' # This is optional - custom class where token could be manipulated e.g. enriched with tenants, UUIDs etc.
),
...
}TEMPLATES = [
{
...
'OPTIONS': {
...
'context_processors': [
...
# Essential !!
'social_django.context_processors.backends',
'social_django.context_processors.login_redirect',
...
]
}
}
]Now comes the best part: Djoser and OAuth2!
AUTHENTICATION_BACKENDS = (
    # We are going to implement Google, choose the one you need from docs
    'social_core.backends.google.GoogleOAuth2',

    # Crucial when logging into admin with username & password
    'django.contrib.auth.backends.ModelBackend',
)

# Client ID and Client Secret obtained from console.developers.google.com
SOCIAL_AUTH_GOOGLE_OAUTH2_KEY = 'YOUR_CLIENT_ID_KEY'

SOCIAL_AUTH_GOOGLE_OAUTH2_SECRET = 'YOUR_SECRET_KEY'

SOCIAL_AUTH_RAISE_EXCEPTIONS = False
# SOCIAL_AUTH_POSTGRES_JSONFIELD = True # Optional, how token will be saved in DB
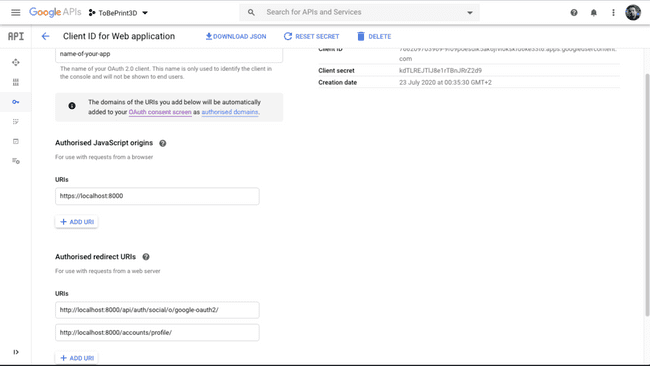
white_list = ['http://localhost:8000/accounts/profile'] # URL you add to google developers console as allowed to make redirection
DJOSER = {
"LOGIN_FIELD": "email", # Field we use to login on extended User model
'SERIALIZERS': {
'user': 'location.to.custom.serializers.CustomUserSerializer', # Custom Serializer to show more user data
'current_user': 'location.to.custom.serializers.CustomUserSerializer', # Custom Serializer to show more user data
},
'SOCIAL_AUTH_ALLOWED_REDIRECT_URIS': white_list # Redirected URL we listen on google console
}Ok! We are done with settings. These are bare minimum to make Google OAuth2 work with DRF and JWT.
3. Explain urls
urlpatterns = [
    # Original Admin panel
    path('admin/', admin.site.urls),

    # Custom JWT implementation. That's optional. It's possible to do this with Djoser settings or just use the default JWT URL
    path('api/auth/jwt/create', CustomJWTToken.as_view()),

    # REST Implementation of Django Authentication system
    path('api/auth/', include('djoser.urls')),

    # Djoser Beta extension for social_django
    path('api/auth/social/', include('djoser.social.urls')),

    # The URL that you could use for testing and that later on can be used for Front-End app Authentication.
    path('accounts/profile/', RedirectSocial.as_view()),

    # The default Djoser endpoints for JWT.
    path('api/auth/', include('djoser.urls.jwt')),
]
4. Create Google OAuth credentials ( Facebook in Part 2 ).
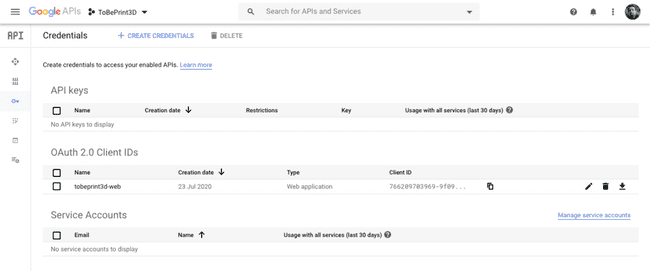
Enter your account and here is how your console should look like.
Here you need to put the redirection allowed URL
5. Use POSTMAN to test the basic flow.
You can download POSTMAN tests to import them and have a better understanding on how those endpoints work.
They come with descriptions and scripted flow so you could have more insights. I will show you a quick test run to obtain a token.
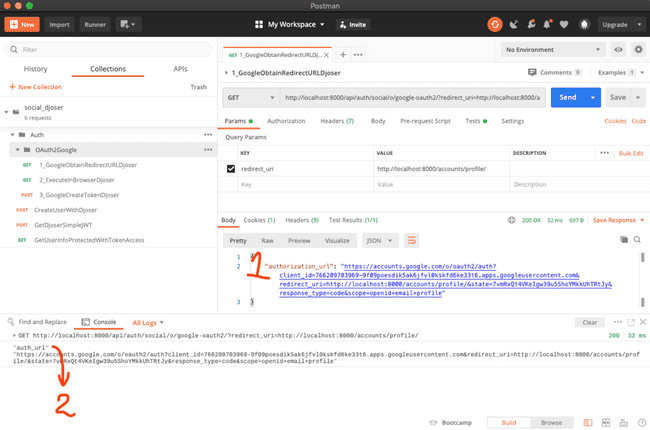
- First run the first GET request in order to obtain URL that opens you Google Login page. Copy the link nr 2. It’s an output of script that replaces HTTPS to HTTP that this endpoint returns ( you can do it manually )
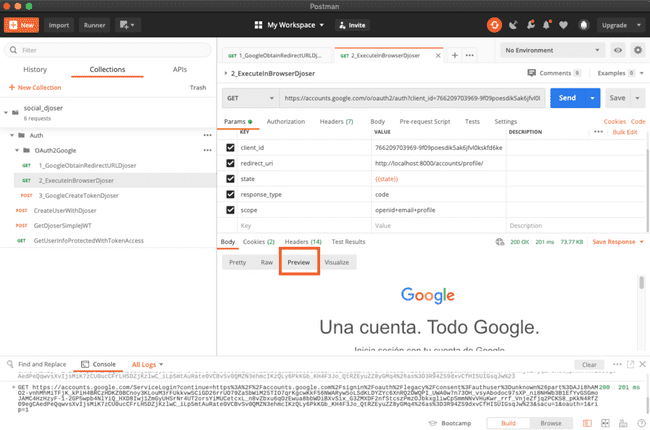
- This step is just a helper, don´t login via postman preview view. Just verify in preview of the second request that you are indeed seeing the login page ( could be skipped and done directly in the browser )
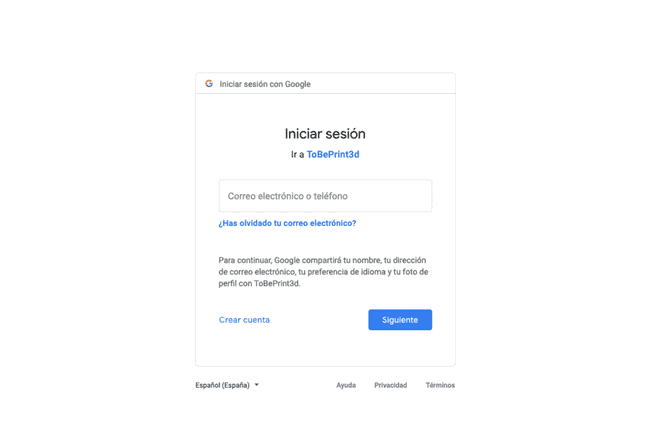
- With the URL copied in step 1 open your browser and navigate to it. You should see a google select profile page or if you are using incognito mode ( or you’re not logged yet to any of google accounts ) you just see this:
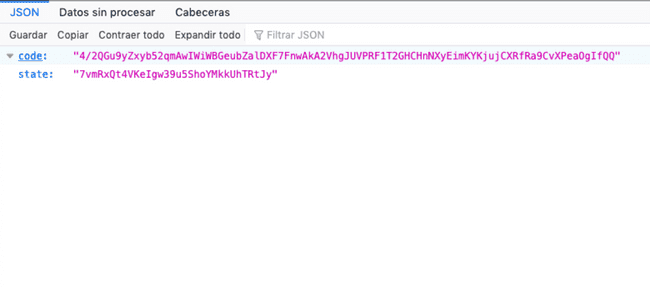
- Finally, once logged in or account selected, you will see the outcome of the endpoint:
path('accounts/profile/', RedirectSocial.as_view()),which just returns JSON view with the code for POSTMAN testing purposes since we are not implementing it with front-end yet.
from django.views import View
from django.http import JsonResponse

class RedirectSocial(View):

    def get(self, request, *args, **kwargs):
        code, state = str(request.GET['code']), str(request.GET['state'])
        json_obj = {'code': code, 'state': state}
        print(json_obj)
        return JsonResponse(json_obj)
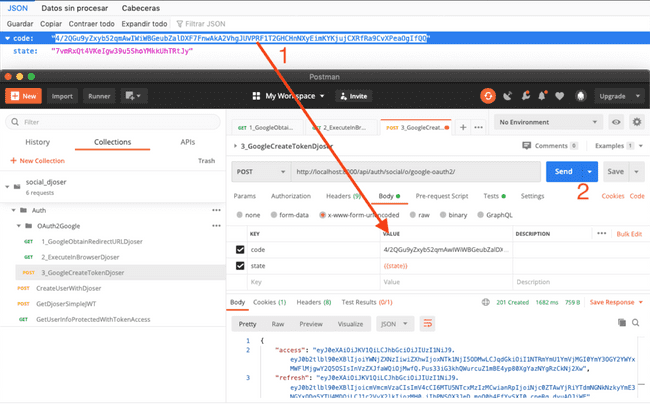
Copy the code to 3rd POSTMAN endpoint (POST) and obtain TOKEN! 🎉🎊
With this token you can authenticate within DRF!
Now seriously, go and make yourself a drink. 🍹 You deserve it!
⏭️ In the second part:
- we implement those endpoints into VueJS front-end app.
- we extend the template with Facebook Sign In Button.
➡️➡️➡️
Did you implement social login with Django? How did you do it? How could I make this tutorial better for you? Share your insights and leave a comment with You are most welcome to see more posts of this type just go to home page

